
Assessing the potential reference sheet
| NOTICE | |
|---|---|
-
Depending on the mode you are working in, 1 of the following options applies to
you:
Option Description Variation A (Standard) If the Operator opts to repeat the print proof, the software continues the process in automatic mode. The described process for obtaining a reference sheet can be repeated as often as desired. Variation B If the Operator opts to repeat the print proof, they must switch to manual mode and then guide the entire process until the end of the job (see The manually-led inspection process. See following figure.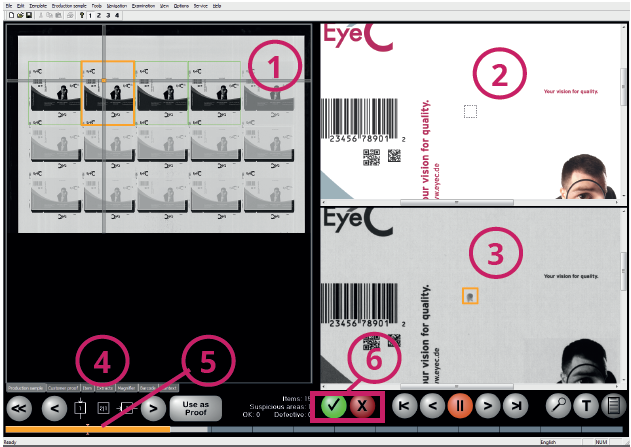
Number Description 1 Display of printed sheet currently being compared to the PDF template with suspicious marks. 2 Display of the PDF template with suspicious marks in close-up view. 3 Display of the printed sheet with suspicious marks in close-up view. 4 Tabs of different views:
- Repeat: Full display of the reference sheet with all suspicious marks displayed. The currently selected reference point is highlighted with a marking cross.
- Template: Close-up view of the selected suspicious marks on the corresponding item in the PDF template.
- Copy: Close-up view of the selected suspicious mark on the corresponding item in the reference sheet.
- Section in all Copies: Close-up view of the currently marked suspicious marks on all copies of the reference sheet.
- Magnifier: Magnified view of the currently marked suspicious areas on the reference sheet.
- Context: Display jumps to an appropriate view.
5 The thick orange bar in the bottom of the display screen is composed of X segments, whereby X stands for the count of all suspicious marks found. The location of the currently selected suspicious mark in the overall context of all suspicious marks found is marked as indicated. If a suspected defect is assessed, the color of the corresponding segment changes to red (= bad) or green (= good). 6 Buttons for the evaluation of suspicious areas:  Good. Every suspicious mark
must be confirmed with this button, so that no errors
are present. The symbol indicating the location of the
suspicious area appears green.
Good. Every suspicious mark
must be confirmed with this button, so that no errors
are present. The symbol indicating the location of the
suspicious area appears green. Bad. The inspected sheet
cannot be used as the reference sheet.
Bad. The inspected sheet
cannot be used as the reference sheet. Forward to the next
suspicious area on the printed sheet.
Forward to the next
suspicious area on the printed sheet. Enlarges the
view of the suspicious area. Click this button again to
jump back to the original view.
Enlarges the
view of the suspicious area. Click this button again to
jump back to the original view. Switches between
the PDF view and the printed sheet view.
Switches between
the PDF view and the printed sheet view. Creates an defect report
and ends the PDF inspection.
Creates an defect report
and ends the PDF inspection.
Figure 1. EyeC Proofiler - display of suspicious areas