
The EyeC ProofRunner software in the printing process
In this chapter, the user is introduced to the fundamental steps of the print inspection with the EyeC ProofRunner system. The EyeC ProofRunner software allows for automatic as well as manual operation. The automatic mode, by which the software responds to signals from the control system of the print machine, is the standard mode of operation. A manual operation of the software is only necessary when there is no signal from the control system of the print machine is available. The following figure shows how the software integrates into the printing process. In the main part of the manual, both the automatic inspection process and the manual process are described step by step.
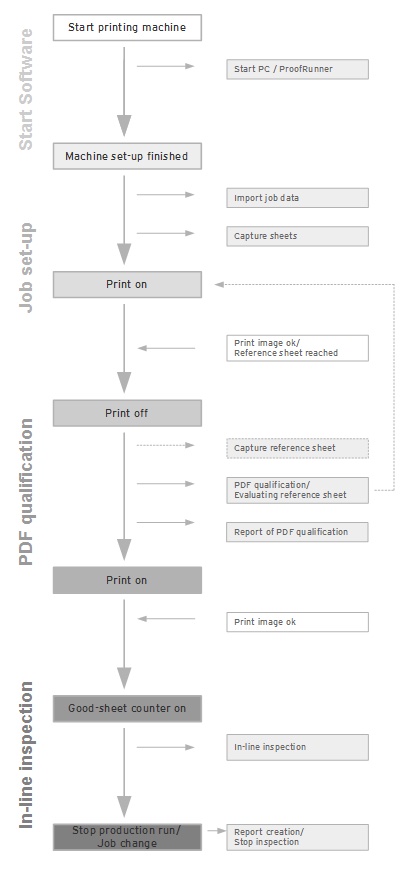
The operation of the inspection process with the EyeC ProofRunner in automatic mode is schematically presented in Schematic diagram of the inspection process in the automatic mode. Some dependencies are customer-specific and will be differentiated by Variation A and Variation B, whereby Variation A is the standard variation. The switching of the software between individual states in the sequence is controlled in automatic mode over 4 external signals from the control system of the printing machine.
The automatic operation is the standard operation mode. The user has the option to manually operate the entire inspection process.
Start print machine
As soon as the user activates the main switch on the print machine and the print machine starts, the PC and EyeC ProofRunner software automatically boots in automatic mode.
Setup completed (first signal)
After the setup of the printing machine, in the course of which the Operator has loaded the job data on the print machine, the EyeC ProofRunner software automatically imports the necessary files for the inspection process. Necessary components of the job data here are the original PDF file template and customer-specific data like the customer name. The full description of how to manually create the job data can be found in The manually-led inspection process.
After the job data is downloaded, the software begins with the image of the sheet.
Print proof (second signal)
| Variation A (Standard) | Variation B |
|---|---|
|
If, after the start up (print on), the printing process obtains a pre-configured sheet, the software takes this as the reference sheet. The customer can define which reference this is. |
Print (third signal)
| Variation A (Standard) | Variation B |
|---|---|
|
With the stopping of the printing process (print from), the software receives a signal for receiving a reference sheet. Starting from the last printed sheet, the software then selects a sheet that is defined by the customer. |
Stopping the print machine is not necessary in Variation B for the inspection process of the EyeC ProofRunner system. EyeC recommends to keep the number of missing sheets as low as possible.
The reference sheet is automatically compared with the PDF template from the job data. When deviations are detected between the quality of the reference sheet and the PDF template, which go beyond the preset limits of the quality parameters, the deviations are displayed. The user then has the possibility to assess these deviations and based on that decide on the continuation of the printing process. When the suspected points are marked as a mistake, the PDF inspection process must be performed with another reference sheet until the desired print quality is achieved.
| Variation A (Standard) | Variation B |
|---|---|
|
If the Operator opts to repeat the print proof, then the software receives the signal for recording a reference sheet after the print proof and jumps back to the corresponding process step in the process sequence. |
If the Operator opts to repeat the print proof, he/she has to switch to manual operation and carry out the entire inspection process manually until the job is completed. |
When no suspicious areas are found or all suspected deviations are marked as “good”, the reference sheet can be used as the template for all following sheets. The user restarts the machine (“Print On”).
Accepted sheet counter ON (fourth signal)
Once the quality of the printed product can be assessed as good (Print Image OK), the Operator sets the switch point for the software with the signal “Good Sheet Counter ON” to start the production process. The software now compares the recorded reference sheet with all successive printed sheets. If no suspicious marks are detected during the print, Operator intervention is not required. After the printing process is complete, a report is generated. In the event of the occurrence of suspicious marks during the production process, the Operator can decide on the progress of the printing process.
The function and operation of the software in automatic inspection operation as well as in manual operation are described in detail in the following chapters.