Gallery viewing tab
Gallery viewing tab - Integration of AI-based approach in the print and inspection process
This chapter explains how the AI-based defect classification is integrated in the process.
In the inspection view on the Gallery tab you see all suspicious areas found during inspection. The deviations are collected on the left side of the screen ((1) in the following figure).
On top on the left side you see the new filter option with the defect classes ((2) in the following figure).
If you click 1 specific deviation on the left side, you see the zoomed-in details on the right side of the screen ((3) in the following figure). The text below the zoomed-in details informs you of group, size, and other details of the deviation ((4) in the following figure).
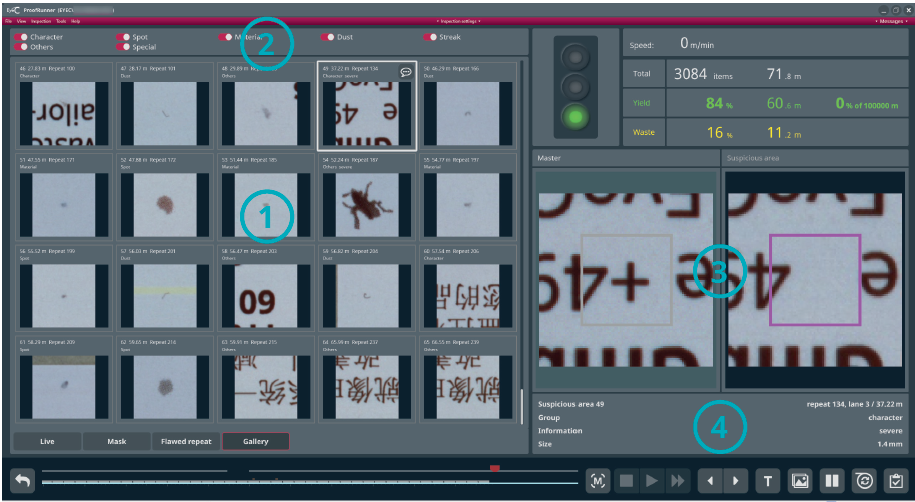
| Number | Description |
|---|---|
| 1 |
All deviations collected |
| 2 |
New filter option with defect classes |
| 3 |
Zoomed-in details of 1 selected deviation on the left side of the screen |
| 4 |
More details of selected deviation, for example group or size |
Gallery - Filtering irrelevant defects in the overview
Prerequisite: The filter options are based on the settings described in the EyeC ProofRunner Sheetfed System Manual .
- If you want to focus only on specific defect types, for example spot defects, select the relevant checkboxes like spots (see (2) in the previous figure) and clear the irrelevant ones like character or streak.
→ Only spot defects remain in the overview.
Gallery - Correcting wrong defect classifications
As the learning of the AI is an ongoing process, you have the possibility to change the classification of defects, for example if a deviation has been incorrectly classified as dust.
- To open the classification dialog, right-click the deviation you want to re-classify.
- In the dialog, select the correct class checkbox, for example material.
→ With your permission, your feedback can be collected by an EyeC Service technician to be integrated in the AI learning process.