
The EyeC ProofRunner software in the printing process
In this chapter, the user is introduced to the fundamental steps of the print inspection with the EyeC ProofRunner system. The EyeC ProofRunner software allows for automatic as well as manual operation. The automatic mode, by which the software responds to signals from the control system of the print machine, is the standard mode of operation. A manual operation of the software is only necessary when there is no signal from the control system of the print machine is available. The following figure shows how the software integrates into the printing process. In the main part of the manual, both the automatic inspection process and the manual process are described step by step. EyeC ProofRunner Sheetfed systems use 2 modes. This manual describes the iX mode. iX stands for instant examination.
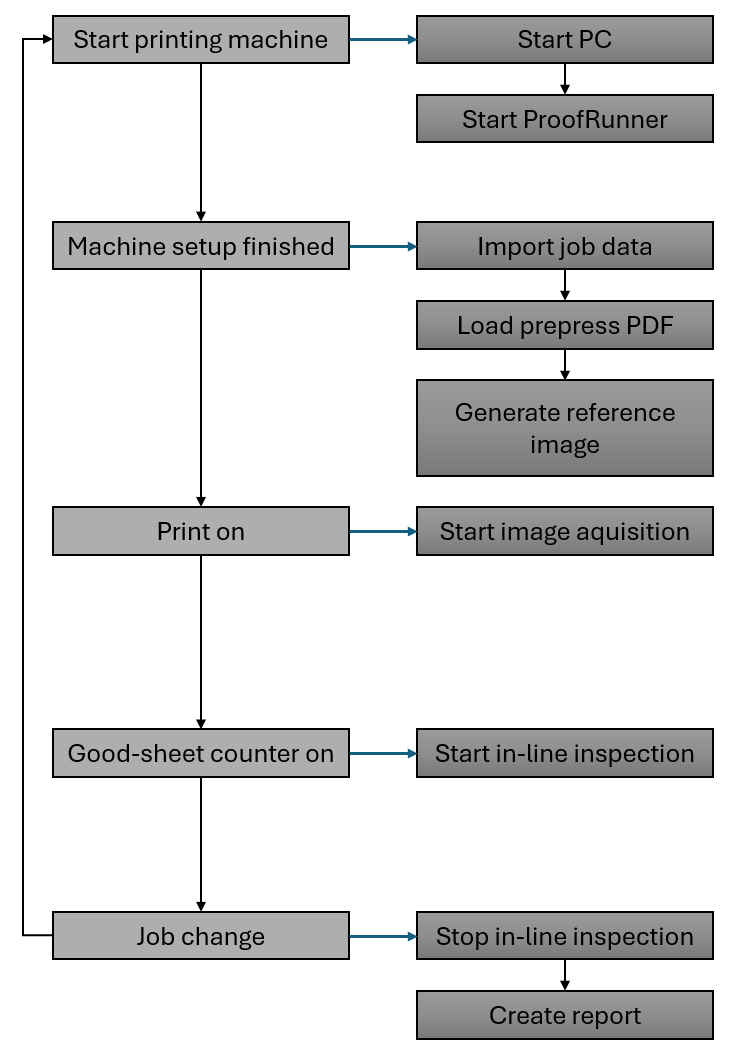
The operation of the inspection process with the EyeC ProofRunner in automatic mode is schematically presented in Schematic diagram of the inspection process in the automatic mode. Some dependencies are customer-specific and will be differentiated by Variation A and Variation B, whereby Variation A is the standard variation. The switching of the software between individual states in the sequence is controlled in automatic mode over 4 external signals from the control system of the printing machine.
The automatic operation is the standard operation mode. The user has the option to manually operate the entire inspection process. After a manual operation by the user, the workflow returns to the automatic operation mode with the next machine signal.
Start print machine
As soon as the user activates the main switch on the print machine and the print machine starts, the PC and EyeC ProofRunner software automatically boots in automatic mode.
Setup completed (first signal)
After the setup of the printing machine, the EyeC ProofRunner software automatically imports the necessary job data for the inspection process. Basic parts of the job data are the PDF proof and customized data such as the customer name. How to manually create the job data is described in detail in chapter The manually-led inspection process. After loading the job data, the EyeC ProofRunner tries to load the prepress PDF that matches the job data.
After loading the prepress PDF, a reference image is created from the PDF, which is used to check every other scanned sheet during the inline inspection.
If available, an inspection mask can be extracted from the PDF and automatically applied. Alternatively, a mask can be drawn manually.
Print on (second signal)
The printing process starts.
Good-sheet counter on (third signal)
As soon as the quality of the printed sheets can be defined as good (“Print image ok”), the operator sets with the signal “Good-sheet counter on” the switching point for the software to start with the in-line inspection. Now the software compares the generated reference sheet to all printed sheets. If during production run no deviations are found, the operator does not have to interact. After having finished the printing process, a report is created. If deviations are found during production run, the operator can decide how the printing process shall proceed.
The function and how to use the software in automatic and manual inspection mode are described in more detail in the following.
Prerequisites for creating a digital master calibration set
The quality of inspection for the EyeC ProofRunner software with digital master depends heavily on calibration data created using the EyeC Calibration print form. The calibration is saved in digital master parameters sets, which need to be selected before creating a digital master from a PDF.
The creation is possible and needed for any material which introduces additional properties into the captured image. At least, but not only, the following properties make a calibration necessary:
- Color of printed image
- Surface structure of material
- Color of material
- Change in reflection properties
A calibration should be valid for 1 material.