
Setting up a print job for the manually-led inspection
-
Start the software by double-clicking on the EyeC ProofRunner
icon on the desktop.
 The start screen appears.
 -
Choose 1 of the following options:
- Enter the job data in the acquisition screen.
- Load a PDF template that can be used as a reference file for the reference sheet.
- Create a reference sheet manually. See Creating a reference sheet without a PDF comparison.
See following figure.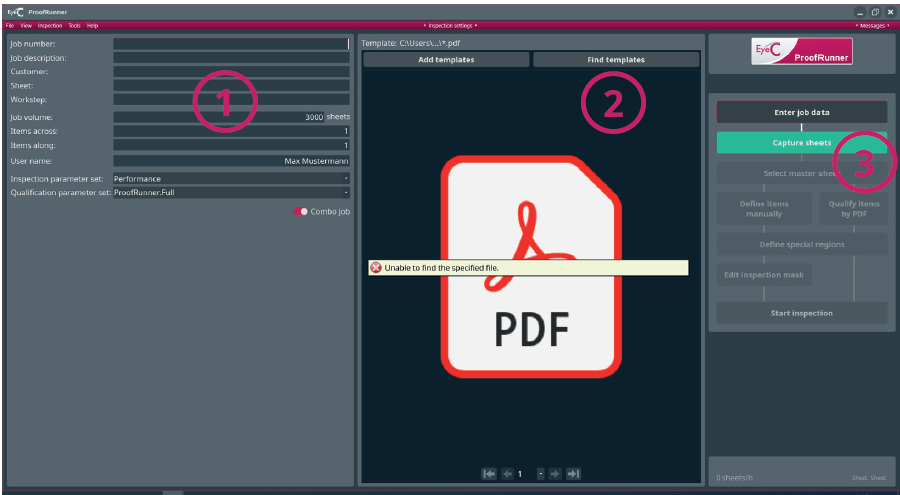
Figure 1. EyeC ProofRunner - Start screen Table 1. EyeC ProofRunner - Start screen Number Description 1 Input fields for job data. These are customer-specific and may differ from the following list: -
Job number: Input field for the job number
-
Job description: Input field for the job description
-
Customer: Input field for the customer’s name
-
Job volume: Input field for the print run
-
Items across: Input field for the number of copies per sheet that are directionally landscape
-
Items along: Input field for the number of copies per sheet that are directionally horizontal
-
User name: Input field for the user’s name
-
Inspection parameter set: Drop-down menu for the selection of inspection parameter sets
-
Qualification parameter set: Drop-down menu for the selection of qualification parameter sets
2 Loads the PDF template.
Should a PDF comparison of the reference sheet be made during the inspection process. the corresponding file can be loaded by clicking on the button.
3 After entering the job data, use the Capture sheet button to capture a sheet.